 |
|
Lesson 9
|
||||||||||||||||||||||||||||||||
| In this lesson we will work
on shifting from our 2nd and 5th C major / A minor pentatonic scale positions. We will also look at a couple very popular chord progressions, fingerpicking and transposition. Review lesson 8 and be sure to have somewhat of an understanding of the topics in this lesson before moving on to lesson 10. |
||||||||||||||||||||||||||||||||
|
|
||||||||||||||||||||||||||||||||
|
||||||||||||||||||||||||||||||||
|
The 3rd and 4th strings work well for shifts. The exercise below is
going to have you practicing shifting on your 3rd string. You will use
your 1st finger to do the shifting both forward and back. Notice in the 1st measure you play A to C twice. The first time you will play A (2nd fret of your G string) with your 1st finger (index finger) and then C on the 5th fret with your 4th finger (pinky finger). Then you will play A again with your first finger but this time you will slide to C with your 1st finger. So now you are in 5th position and will play the D on the 7th fret with your 3rd finger. Then back to C with 1 and slide back to A with 1. Then repeat. Try playing along wih this midi file (right
click to open in new window). |
||||||||||||||||||||||||||||||||
 |
||||||||||||||||||||||||||||||||
|
The video below goes over the above exercise: |
||||||||||||||||||||||||||||||||
|
|
||||||||||||||||||||||||||||||||
|
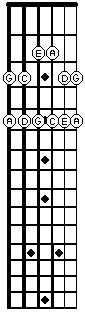
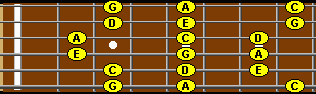
Patterns With this pattern we will go up 4 notes at a time. We are using the 2nd position C major/A minor pentatonic scale from above. Start on G and go up 4 notes in the scale (G, A, C, D), then go back 2 and start on A and go up 4 notes (A, C, D, E), go back 2 again and go up 4 from there (C, D, E, G). Continue all the way up. Just like our scales we should practice the scales up and back down. When you move the pattern down it will go like this. Once you get to the high A (5th fret of your high E string, should be your 4th finger), you will go down 4 notes (A, G, E, D) then go back up 2 to G and go down another 4 (G, E, D, C) and up 2 to E and back down 4 (E, D, C, A) and so on until you get back to the low G. You should practice this pattern with all the major scale forms you have learned thus far. 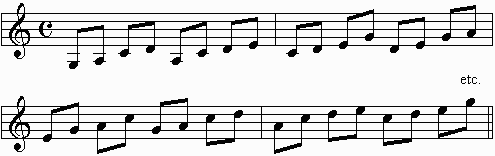 |
||||||||||||||||||||||||||||||||
|
The player to the right has 3 examples of the pattern from above being played over a progression. Eighth, eighth note triplets and sixteenth notes. For slower connection speeds: Midi example (right click to open in new window) In the midi example you will hear the pattern played up and back down as eighth notes with the A being played twice at the top (once to end the ascending pattern and again to start the descending patter) and then sixteenth notes and then eighth note triplets. |
||||||||||||||||||||||||||||||||
|
|
||||||||||||||||||||||||||||||||
|
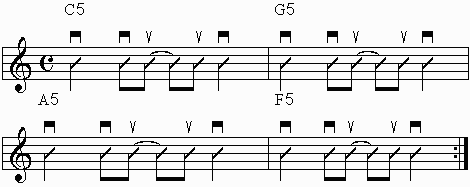
Chord Progression - I V vi IV Blink 182 - Dammit Another popular chord progression used in many songs: 1 5 6 4 but written as I V vi IV Notice the upper case roman numerals for the major chords and lower case roman numerals for the minor chord. If that doesn't make any sense review lesson 3. Also notice that the strum pattern is the same as in the Greenday tune Time of Your Life from lesson 7. This time it is a bit faster :) |
||||||||||||||||||||||||||||||||
|
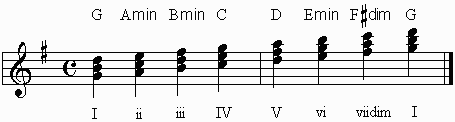
Let us move the above Blink 182 progression to a different key. Let's move it to the key of G major. Because we learned the chord progression was a I V vi IV progression, we can build a G major scale and build the chords and fill in the progression:
|
||||||||||||||||||||||||||||||||
| So you can see the advantage of understanding chord progressions as numbers in relationship to a key. The chart to the right shows how easy it is to change keys. Could you find the same progression in the key of D? |
|
|||||||||||||||||||||||||||||||
|
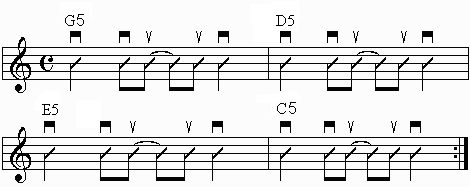
Since the Blink 182 tune used just power chords we would just play power chords in G:
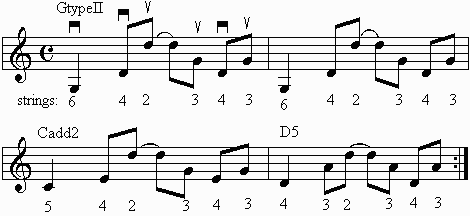
We looked at the I V vi IV progression above and now let's take a different look at it. You probably already know that E minor is relative to G major, so let's play the progression above in the Key of G but let's start on the Em. Key of G = G D Em C Key of Em= Em C G D Interesting eh? The same chords but because it starts on a minor chord it is called a minor key and starting on a major chord made it a major key. It isn't always this simple and we will expand on it as we go through the lessons.
Greenday's 21 Guns verse uses this progression but in the key of Dm (more on this later) |
||||||||||||||||||||||||||||||||
|
||||||||||||||||||||||||||||||||


| Vancouver British Columbia Canada 604 357-3551 http://www.musiclearning.com |